Getting Started
Installation
Getting ZoboUI up and running in your Unity project is straightforward. You can install ZoboUI through OpenUPM (Recommended) or the GitHub repository.
Requirements
ZoboUI is only available for Unity 2022.3 and above. If you are using an older version of Unity, you will need to upgrade before installing ZoboUI.
Installation Options
Using OpenUPM
ZoboUI can be installed via OpenUPM, which is a third-party registry that serves scoped packages. To use OpenUPM to manage ZoboUI in your project, follow these steps:
Configure Scoped Registry: Open
Edit/Project Settings/Package Managerin Unity.Add Scoped Registry: Click on the
+button to add a new registry. If there is an existing entry for OpenUPM, you may edit it instead.- Name:
package.openupm.com - URL:
https://package.openupm.com - Scope(s):
com.oyacamp.zoboui
- Name:
Save the Configuration: Click on
SaveorApplyto confirm the new scoped registry settings.Install the Package:
- Open
Window/Package Manager. - Select
My Registriesfrom the dropdown menu at the top-left corner. - You should see
ZoboUIlisted in the package list. If it's not there, click on theRefreshbutton to update the package list. - Click on it to install the package if it's not already installed.
- Open
Alternatively, you can manually add ZoboUI to your project by merging the following snippet into your Packages/manifest.json file:
{
  "scopedRegistries": [
    {
      "name": "package.openupm.com",
      "url": "https://package.openupm.com",
      "scopes": ["com.oyacamp.zoboui"]
    }
  ],
  "dependencies": {
    "com.oyacamp.zoboui": "0.1.0"
    // ... other dependencies
  }
}
Replace 0.1.0 with the specific version you want to install.
Using the GitHub Repo
Open Your Unity Project: Start by opening the Unity project where you want to install ZoboUI.
Access the Package Manager: In Unity, go to
Window>Package Managerto open the Package Manager window.Add Package from Git URL: Click on the
+icon in the top-left corner of the Package Manager, and selectAdd package from git URL....Enter the GitHub URL: In the dialog box, enter this URL:
https://github.com/oyacamp/zoboui.git.Install the Package: Click
Addto install the package. Unity will download and install ZoboUI into your project.
Upcoming Availability on the Asset Store
We are working on making ZoboUI available through the Unity Asset Store. These options will provide an even more seamless installation process. Stay tuned for updates on this front.
Next Steps
After successfully installing ZoboUI, you'll need to generate a USS file before you can start customizing your UI.
Generate a USS File
- Create a Theme Config Manager asset: With your Unity project open, go to
Assets>Create>ZoboUI>Theme Config Manager. This will create a new Theme Config Manager asset in your project, which is what you'll use to configure how your USS file is generated. - Select the Theme Config Manager asset: In the Project window, select the newly created Theme Config Manager asset.
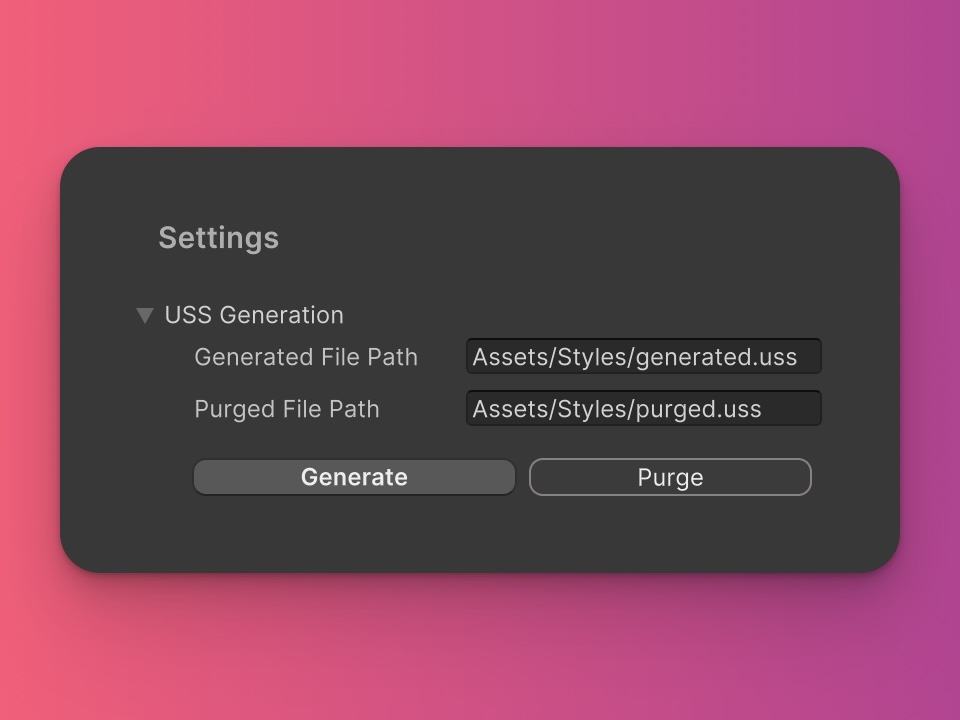
- Find the USS Generation Section: In the Inspector window, find the
USS Generationmenu under theSettingssection. You'll find a field that determines where the USS file will be generated. By default, the generated file will be placed in theAssets/Stylesfolder asgenerated.uss. You can change this to any path in your project. - Generate the USS File: Click the
Generatebutton in the Inspector window. This will generate a USS file in your project. You can then reference this file in your UI elements to apply the styles.